
When you have plaster walls at home or office, you would realize that although they provide it with a vintage style and finish that is smooth, it is not resistant to wear and tear. Noticing the small plaster wall issues in time and learning to repair them can help you avoid wasting time, money and a great deal of frustration later.
So in this blog, we will take you through the most common plaster wall problems you could be facing, how you could know how to diagnose each one and above all how you could be able to fix each of these problems by yourself or when you should call in the pro to do it. Be it cracking, protruding plaster or ugly stains, you will get the courage to confront them, face these problems and maintain perfect appearance of your walls.
Understanding Common Plaster Wall Problems
Bulging and blistering Plaster
Blistering plaster resembles bubble or can be described as bulges on the ceiling or wall surface.
Common causes:
- Weak sticking because of the dust, contaminated or smooth material.
- Wetness that is located behind the plaster due to leakages or condensation.
- using too much plaster in a coat, so that it comes off in pieces when drying.
Visual signs:
Protruding mounds or blisters on the plaster surface that can be hard or soft.
The cause of the moisture should be found and abated before patching because when this cause is not discovered, the issue is repeated.
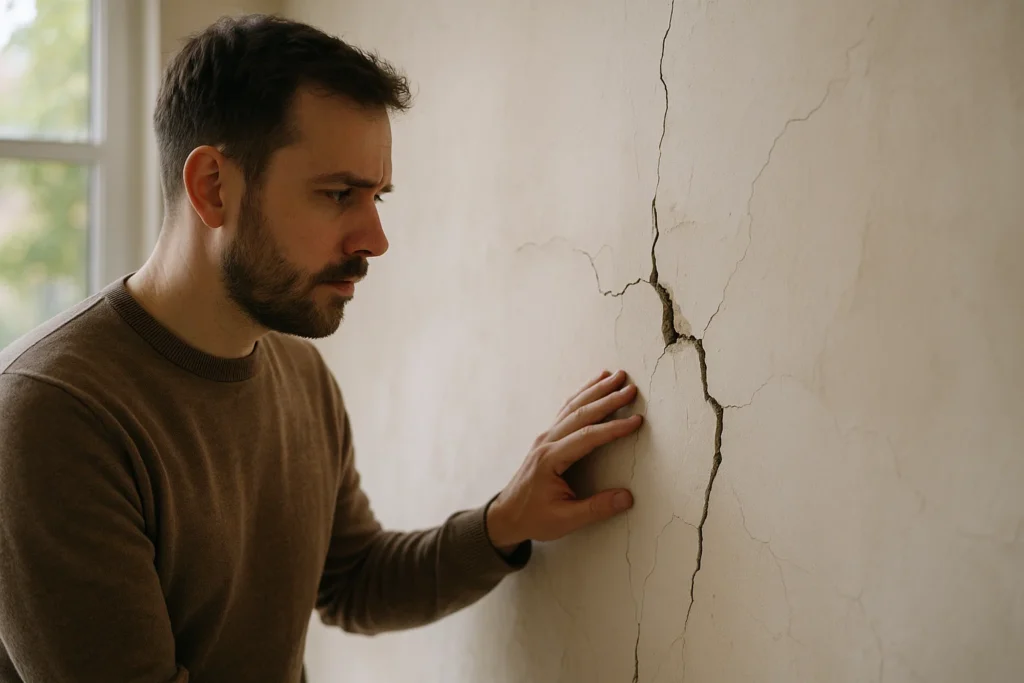
Cracks in Plaster
The most visible and apparent plaster wall issue is cracks, not all cracks are alike, though.
Types:
The major types of cracking plasters are as follows:
- Hairline cracks: These are small cracks that are thin and are usually as a result of the plaster drying or the natural compression that is in your house. The majority of them are not dangerous and can be fixed easily.
- Delaminating cracks: These are cracks caused by the plaster that peels off its base lath and usually creates the hollow structure and even danger of falling plaster predominantly on ceilings.
- Settlement cracks: These are wider cracks or ones that are the most likely to be caused by structural or foundation movement and are the effects of severe problems.
How to spot them
Pay attention to the presence of fine or jagged lines on walls or the ceilings. You can tap around the cracks, tap and see how hollow it is, you might have delamination.
When to DIY
Hairline cracks are generally not a big problem and may be easily repaired at home.
When to contact a professional
In the event that the cracks are wide, expanding or they are accompanied with structural issues, then call a professional as soon as possible.
Falling and Crumbling Plaster
This issue seems to be more severe. When the plaster is falling or crumbling away, it can be an indicator of moisture damage, of aging, or of poor plaster mix.
Causes include:
- Escaping water or high humidity that makes the plaster begin to lose its sticking.
- Wear of nature due to years.
- Lacklustre initial implementation.
You will find loose flakes, dust or chunks coming off. This needs to be comprehensively repaired to fix the appearance and the safety of your walls.
Discoloration and Water Stains
Plaster water stains have an unattractive outlook as yellow or brown or even dark stains that are signs of moisture leakages or water ingress.
Signs to watch for:
- Patches that have turned pale or faded.
- Wet touch or even mould behind the or on the plaster.
Water stains cannot and must not be ignored as they most frequently are the predecessors of much more serious tasks such as plaster crumbling or wooden structure rot.
Other Defects
- Efflorescence: White chalk-like deposits forming on the surface of a plaster as a result of the deposits of salts left behind by the evaporation of moisture.
- Hollow plaster: A tapping sound that is hollow in nature materializes in detached plaster.
- Nail pops: This is the situation whereby nails or screws under the plaster are poking through, creating small lumps.
How to Identify Plaster Problems
Prior to your grabbing a repair kit, it is nice to have a dependable means of checking plaster:
- Conduct a visual inspection under good light: There should be no cracks, bulges, discolouration, or flaking.
- Sound test: Gently give it a tap to hear hollow or solid impact that would signify detachment.
- Watch any problems day-by-day or week-by-week to develop.
- Take basic equipment that includes; a flashlight to identify the damaged spots, a moisture meter to identify wetness, and a utility knife to perform the test probes in places necessitated by circumstances.
Consistent checking helps in detecting the small problems before they grow big.
Step-by-Step Repair Guide for Common Plaster Problems
Repairing Cracks
In small cracks of hairline:
- It is cleaned with a brush or vacuum cleaner.
- Gaps and cracks may be filled with a flexible filler or spackling compound.
- After they are dry, sand smooth using fine sandpaper.
- The area should be painted in matching wall paint.
In the case of delaminating cracks:
- Safely take off the loose plaster.
- The plaster should be reattached to the lath by using Plaster washers or drywall screws.
- Use patching plaster to fill cracks and holes.
- clean and repaint.
Fixing Blistering and Bulging Plaster
- Blistered section is removed with a utility knife.
- Blast off any loose and broken plaster.
- Code the moisture-generating problem to avoid reoccurrence.
- A plaster bonding agent should be applied to the uncovered area.
- Re-plaster this in fine coats.
- prime and paint.
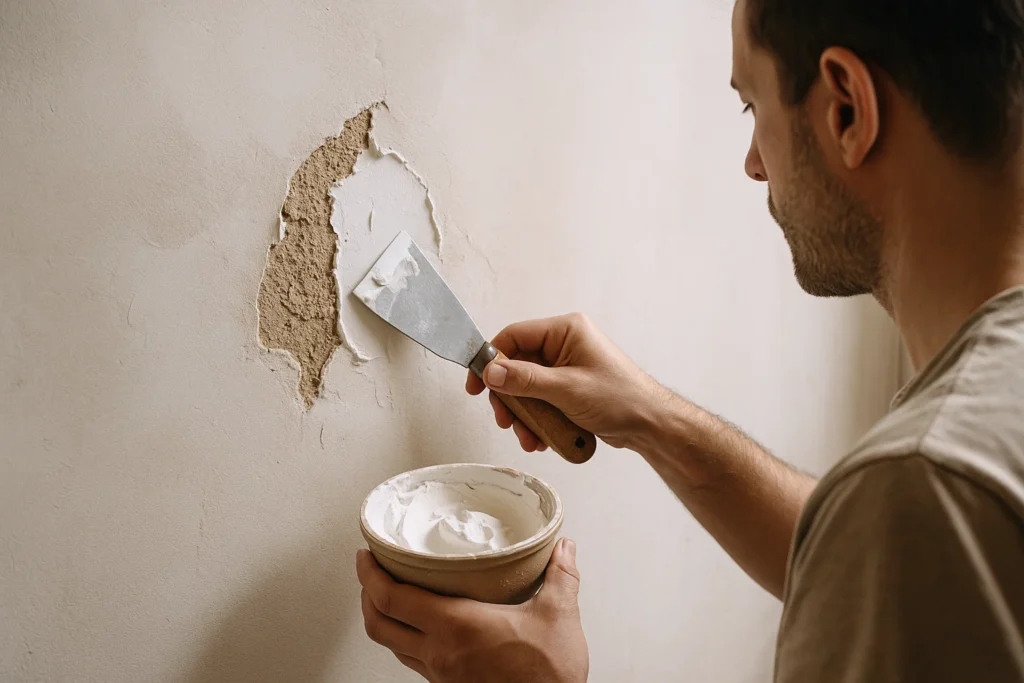
Repairing Crumbling Plaster
- Rotten plaster should be scraped out until solid base is reached.
- Replaster what you bond up with a bonding agent.
- Apply a good quality plaster mix to fill the area smoothly.
- The plaster should dry fully.
- To sand and paint to blend in with the other surfaces.
Treating Water Damage and Discoloration
- Identify and repair any leaks (roof, pipes, windows).
- Wet the affected area with fans or dehumidifiers.
- Apply a water stain blocking primer that promises to seal water stains.
- Any extensively blighted plaster should be replaced entirely
- Coat in paint.
Preventative Tips to Avoid Future Problems
- Surfaces should be properly prepared; clean first and get the dust off.
- Control the inside humidity through ventilation and dehumidifiers.
- Fix leaks on time and inspect the roofing or plumbing at intervals.
- Use premium material of plaster and apply it in thin layers.
- Regular inspections should be carried out, particularly in old structures.
When to Call a Professional
In other cases, it is better to call in professionals:
- Fixing or repairing within the structure or repairs related to the foundation.
- Big piles of plaster delamination that cause a safety hazard.
- Historical, or unknown wet issues
- Difficult or repeated repairs that cannot be done DIY style.
A plastering expert will evaluate the underlying cause and make sure that the repair will last long.
Wrapping Up
Spotting and fixing the common plaster wall issues early enough is the only way of ensuring that your walls will remain safe and beautiful. This guide has now equipped you with the knowledge to identify such batting signs as cracks, blistering, crumbling and water stains and what you can do to address them effectively.
Prompt fixing does not only enhance aesthetics but saves more expensive destruction in the future. And in case you are in a pickle always get a professional plasterer to do the work properly. If you need professional help or more tips just contact us at Neimman Painting.
FAQs
Some of the common plaster defects are blistering, cracking, efflorescence (white salt spots), peeling, flaking, popping, softness, uneven surfaces and debonding where the plaster falls off the wall. Such problems are due to moisture infiltration, improper mixing or application, substrate and structural movement.
Revive badly cracked plaster: By chipping out all loose, or crumbled plaster down to a sound ground, applying a bonding agent, and then replastering in three or four thin coats. Once it is dry, smooth and repaint; if the problem is quite serious a specialist intervention may be required.
The initial plastering may require the preparation or surface of the substrate through cleaning, loosened debris, and drying of the surface, and fixing a bonding agent or mechanical keying of such a substrate to enhance good adhesion of plaster.
