
Plaster ceilings give a home character and timeless beauty, but when cracks, sagging, or holes start to appear, that charm quickly fades. It may be an aging ceiling, a damaged ceiling, or a bump that has happened, but it comes; a damaged plaster wall is not only unsightly but also dangerous to leave. The good news? Your ceiling can be restored to its original condition with the proper equipment, precautions, and repair methods.
It is not only about fixing cracks, but also about taking care of your house and maintaining its structure and smooth, elegant finish. We are going to take you through all the steps that include the precautionary measures and equipment as well as the step-by-step process of repair in this guide. You will also find out when to call in the professional to repair your plaster ceiling so that your place will be safe and beautiful even after some years.
Understanding Plaster Ceilings and Common Problems
What Is a Plaster Ceiling and How Does It Differ from Plasterboard
Plaster ceiling consists of a mixture of lime, sand and water (with or without gypsum) and is applied on top of wooden laths or metal mesh. It forms a hard and resistant surface that is common in old houses and other ancient structures. Plasterboard ceilings referred to as drywall or gypsum board ceilings, are the modern types consisting of large panels which are quicker to put up and are simple to repair.
The primary distinction is in the structure and repair requirements:
- Plaster ceiling is more robust, extended and soundproofed.
- The ceilings made of plasterboards are less bulky and can be easily substituted in case of severe damage.
It is important to know what your ceiling is made of as this will guide you on the correct method of repair.
Common Causes of Cracks, Breaks, and Sagging
Even properly constructed plaster ceilings have problems that develop over the course of time. Some common causes include:
- Age and settlement: Houses tend to shift and create minor cracks.
- Water damage: Roof or plumbing leaks may weaken plaster causing it to sag or break.
- Poor installation: Plaster may fall away due to poor installation.
- Temperature changes: Upswelling and downswelling of materials lead to stress on the ceiling.
- Accidental impact: A sudden crack or a hole can be brought about by a heavy object or vibration.
Being aware of the cause will aid in being sure you correct not just the surface but the cause of the problem as well.
Signs Your Ceiling Needs Repair or Replacement
You should be on the lookout for these indicators when it is time to fix your plaster ceiling:
- Observable cracks or peeling regions.
- Bulging or sagging sections
- Colored spots (indication of water damage)
- Plaster dust or little pieces falling.
- A hollow sound when tapped
When your ceiling exhibits some of these symptoms, then it is appropriate to fix it as soon as possible before the damages extend.
Safety Tips Before Starting Any Plaster Ceiling Repair
Turn Off Power and Protect the Work Area
Always switch the power to the area off before beginning to work on it, particularly when you are working around or close to a light bulb or ceiling fan. Protect the floor and furniture using drop cloths in case of dust and debris. Cleaning up to create a neat place helps to avoid accidents and simplify the cleaning process.
Wear Proper Safety Gear (Gloves, Mask, Goggles)
Plaster dust may irritate the skin, eyes and lungs. Always wear:
- Safety goggles
- A dust mask or respirator
- Work gloves
- Long sleeves
This equipment ensures that you are protected during the sanding, cutting or scraping of old plaster.
Use Stable Ladders or Scaffolding for High Ceilings
At work, stability is important when overheading. Take a strong ladder or scaffolding stand that can support you and your equipment. Do not overstep or put your foot on wobbly furniture. Balance and patience are essential in working at height; take your time.
Inspect for Structural or Water Damage First
There may be defects in the roof, joists or mould that is concealed before any plaster ceiling repair is done. Plaster repair without repairing the cause of the problem will merely result in the recurrence of the problem. In case you find any wet spots you should repair the leak and allow the ceiling to fully dry before beginning.
Tools and Materials You’ll Need for Ceiling Repair
Essential Tools for Patching and Plastering
To replace a plaster ceiling, collect:
- Plastering trowel and hawk
- Utility knife
- Putty knife or scraper
- Sandpaper (medium grit and fine grit)
- Washers (to be used in sagging sections), drill and plaster.
- Paint roller and brushes
These tools facilitate the application process and make the process of repair more professional.
Choosing the Right Type of Plaster or Plasterboard
To repair traditional plastering of the ceiling, gypsum-based plaster should be used to withstand and be fast-drying. Joint compound or patching plaster should be used on drywall should be used in case your ceiling is plasterboard.
Additional Materials for Large Cracks or Ceiling Breaks
To do large repairs or fractures to ceilings with plaster, you will require:
- Fiberglass mesh tape
- Bonding agent
- Finishing plaster and base coat.
- Replacement lath (in case the old one is loose or missing)
Being prepared with all the materials helps to save time and the flow of the work.
Step-by-Step Guide: How to Repair a Plaster Ceiling
Step 1 – Prepare the Ceiling Surface
Begin by cleaning out all loose plaster, dust or paint from the damaged area. Wipe with a putty knife to clean a bonding surface. Cleanse it with a damp cloth and dry it.
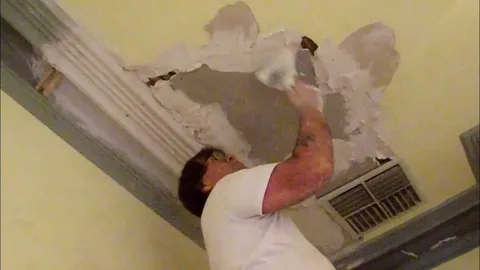
Step 2 – Remove Loose or Damaged Plaster
In case pieces of plaster have detached themselves from the lath, remove these carefully. Tapman around the area- hollow sounds are the loose ones that have to be removed. In the case of sagging ceilings, plaster can be refixed with the help of plaster washers and screws.
Step 3 – Apply Bonding Agent and Base Coat
Roll or brush a bonding agent on the cleaned area. This makes the newly plastered material adhesive. Then smear a base coat on with a trowel firmly into the cracks or damaged areas. Blot it and leave it to dry (usually 24 hours).
Step 4 – Finish with a Smooth Top Coat
After the base coat is hardened, combine and apply a finishing layer of plaster. Apply it to spread thinly, feathering the edges to match the rest of the ceiling. Then make the surface as smooth as possible, so that you can do less sanding later.
Step 5 – Sand, Prime, and Paint
Once the plaster has completely dried, gently rub the plaster with fine-grit sandpaper until it is completely smooth. Apply a primer to seal the surface, then finish with ceiling paint that matches the rest of the room.
Your plaster ceiling repair is now complete!
Tips for a Long-Lasting Ceiling Finish
Preventing Future Cracks and Water Damage
- Leaks in your roof are to be checked regularly.
- Always keep the place well-ventilated to avoid moisture accumulation.
- Do not suspend heavy things on ceilings not designed to bear such heavy loads.
- Seal minor cracks when they are small.
Regular Maintenance and Inspection
Have your ceilings inspected every year to determine whether they have early signs of stress (hairline cracks or discolouration). It saves time to do the repair in the early stage and avoid expenditure on repairs at a later stage.
When to Hire a Professional Plaster Repair Expert
Small fixes can be handled by DIYers; however, small and large pieces of sagging material or cracks in the structure should be handled by professionals. Seasoned plasterers are able to achieve safe and durable outcomes and perfectly match up with existing finishes.
Conclusion
It is not simply about appearance, but you should repair your plaster ceiling to ensure that your house is safe and sound. Using appropriate methods of repairing plaster ceiling, you can reconstruct the beauty, eliminate additional damage, and increase the life of your ceiling.
Patience and safety are a long wayfrom whether you are filling in a small crack or a huge crack in a ceiling with plaster. When the project seems too complicated, do not be afraid to seek the services of a professional.
Visit Niemann Painting to learn further concerning expert ceiling repair and painting services.
FAQs
wash off the broken part, put on a bonding agent, patch using plaster, then level it then sand and paint when it is dry.
The primary culprits, regarding cracks and sagging, are age, moisture, and structural movement.
Yes, for small holes or cracks. In case of big breaks or areas that may sag, it should be assisted by professionals.
Plaster ceilings are concrete and conventional, whereas plasterboard ceilings adopt the modern gypsum panel, which can be easily substituted.
Quick fixes require a few hours. Between the coats, larger works may require two to three days to dry.
